
A Beginner’s Guide to Iyengar Yoga Sequences
If you are new to yoga and looking for a safe, structured way to build strength, flexibility and confidence, an iyengar yoga sequence for beginners can be an excellent place to start. Unlike other styles of yoga, Iyengar Yoga emphasises precision, alignment and an understanding how each pose affects the body.
One of the distinctive features of Iyengar Yoga is the way poses are organised into carefully planned sequences. Rather than practising postures at random, each pose prepares the body so the student makes gradual progress. This intelligent approach helps beginners develop stability, awareness and confidence while reducing the risk of strain from repeating poses over and over again.
Whether you are completely new to yoga or returning after a break, a thoughtfully designed sequence can help you establish a safe and sustainable practice at home. In this guide, you’ll learn how Iyengar sequences are structured, which props are most useful, and how to begin your own home practice using simple beginner-friendly sequences.
Why Home Practice Matters in Iyengar Yoga
Regular classes or one to one sessions provide essential guidance, but home practice has always been an important part of the Iyengar Yoga tradition. Practising at home allows students to revisit what they have learned to help with their specific issues, and to develop a deeper understanding of the poses.
One of the benefits of an iyengar home practice is that you can work at your own pace. Without the distractions of a group setting, it becomes easier to observe alignment, breathing and the effects of each pose over time.
In my experience, many beginners believe they need long practices to make progress. In reality, a consistent 15 minutes a day, several times per week is often more valuable than a single long session done occasionally.
Home practice also helps develop independence. Over time, students gain confidence to practice on their own, and begin to understand how poses relate to one another. This understanding becomes an important foundation for future progress.
If you are looking for additional poses suitable for practising at home, you may enjoy our guide to Yoga Poses to Practice at Home.
Essential Props for Home Practice
Props are one of the defining features of Iyengar Yoga. Rather than making poses easier, props help students experience the correct actions and alignment regardless of age, flexibility or physical limitations.
For a beginner practice, the following props are particularly useful:
- A sticky Yoga mat to stop feet slipping
- Four foam yoga blocks or a yoga bolster
- A long Yoga belt or strap
- A small blanket or two
- A Chair without arms
- Access to a wall
Many beginners are surprised by how much they learn through the use of props. A block between the hand and the floor, for example, helps students maintain length in the spine and openness in the chest rather than collapsing towards the floor. Even a chair, a couple of blocks and some wall space can support a highly effective beginners’ Yoga practice. There are other props like cork bricks too, that you may wish to add to your kit over time.
How Iyengar Yoga Sequences Are Structured
An important feature of any iyengar beginner sequence is that poses are arranged in a deliberate order. Each category of pose creates specific physical and mental effects while preparing the student for what follows.
Before adding more complex elements, you need strong foundations. In yoga, those foundations are usually established through standing poses. Personally I like to teach modifications to give the highest chance of success in the poses- things like calf muscle release (Tadasana with feet half on blocks), poses for hamstring activation, quadricep extension etc.
Standing Poses
Standing poses create strength, stability and awareness. They teach students how to distribute weight through the feet, organise the legs correctly and maintain length in the spine. Sometimes when we’re tired, we feel like lying down, but standing poses will brain energy into the body.
Many beginners focus on flexibility, but standing poses teach something equally important: stability. In Iyengar Yoga, stability comes before depth.
Forward Extensions
Forward bends help quieten the nervous system and lengthen the back body. They encourage students to move with patience rather than force. For many students with tight backs and tight hamstrings these are the last poses I introduce; and even then with lots of props to ensure safety.
Twists
Twisting poses improve spinal mobility and help students understand how different parts of the body work together. They can also reveal habitual asymmetries that may otherwise go unnoticed. Twists can be standing by the wall, seated on a chair, and eventually, sitting on the floor.
Back Extensions
Backbends strengthen the back body, improve posture and create openness across the chest. In beginner sequences these are often introduced gradually and with support. I teach modified standing back bands and reclining backbends on bolsters to help beginners benefit from this group of poses.
Inversions
Inversions are an important part of Iyengar Yoga but should generally be learned under the supervision of a qualified teacher. For beginners, simpler standing, seated and restorative poses usually provide a more appropriate starting point. Poses like bent leg viparita karani are technically inverted, without any additional balance required. The practice sequence here has setu Banda bridge pose which is a relatively easy introduction to inversions.
Restorative Poses
Every good basic iyengar sequence includes a period of rest. Restorative poses and Savasana allow the nervous system to absorb the effects of practice and develop quiet awareness. Lying down with the calves on a chair seat can be surprisingly restful.
Understanding these categories helps explain why Iyengar Yoga sequences feel so different from simply selecting a few random poses. It is not necessary to try all of these poses as a beginner; if you struggle with forward bends, for example, it’s okay to wait til they feel more achievable.
15-Minute Iyengar Yoga Sequence for Beginners
This short iyengar yoga sequence for beginners is suitable for most healthy beginners and can be practised several times each week, or even everyday.
1. Sukhasana (Simple cross legged pose) – 2 Minutes
Sit cross legged on some height with the eyes closed and focus on the breath for 2 minutes. Traditionally the hands are held in prayer position (namaskar).
2. Parsvottanasana (Extension of the trunk pose) – 1 Minutes each side x 2 repetitions

Place your hands on the wall or on a closed door and step one foot back diagonally. Focus on straightening the arms and legs. This can be repeated twice.
4. Adho Mukha Svanasana (Downward Facing Dog) – 2 Minutes
The classic Yoga pose that everyone recognises! Press firmly through the hands, lengthen the sides of the torso and draw the thighs back. The whole spine extends upwards. Rest kneeling (a blanket can be placed under the knees). If it feels uncomfortable you can repeat Parsvottanasana instead.
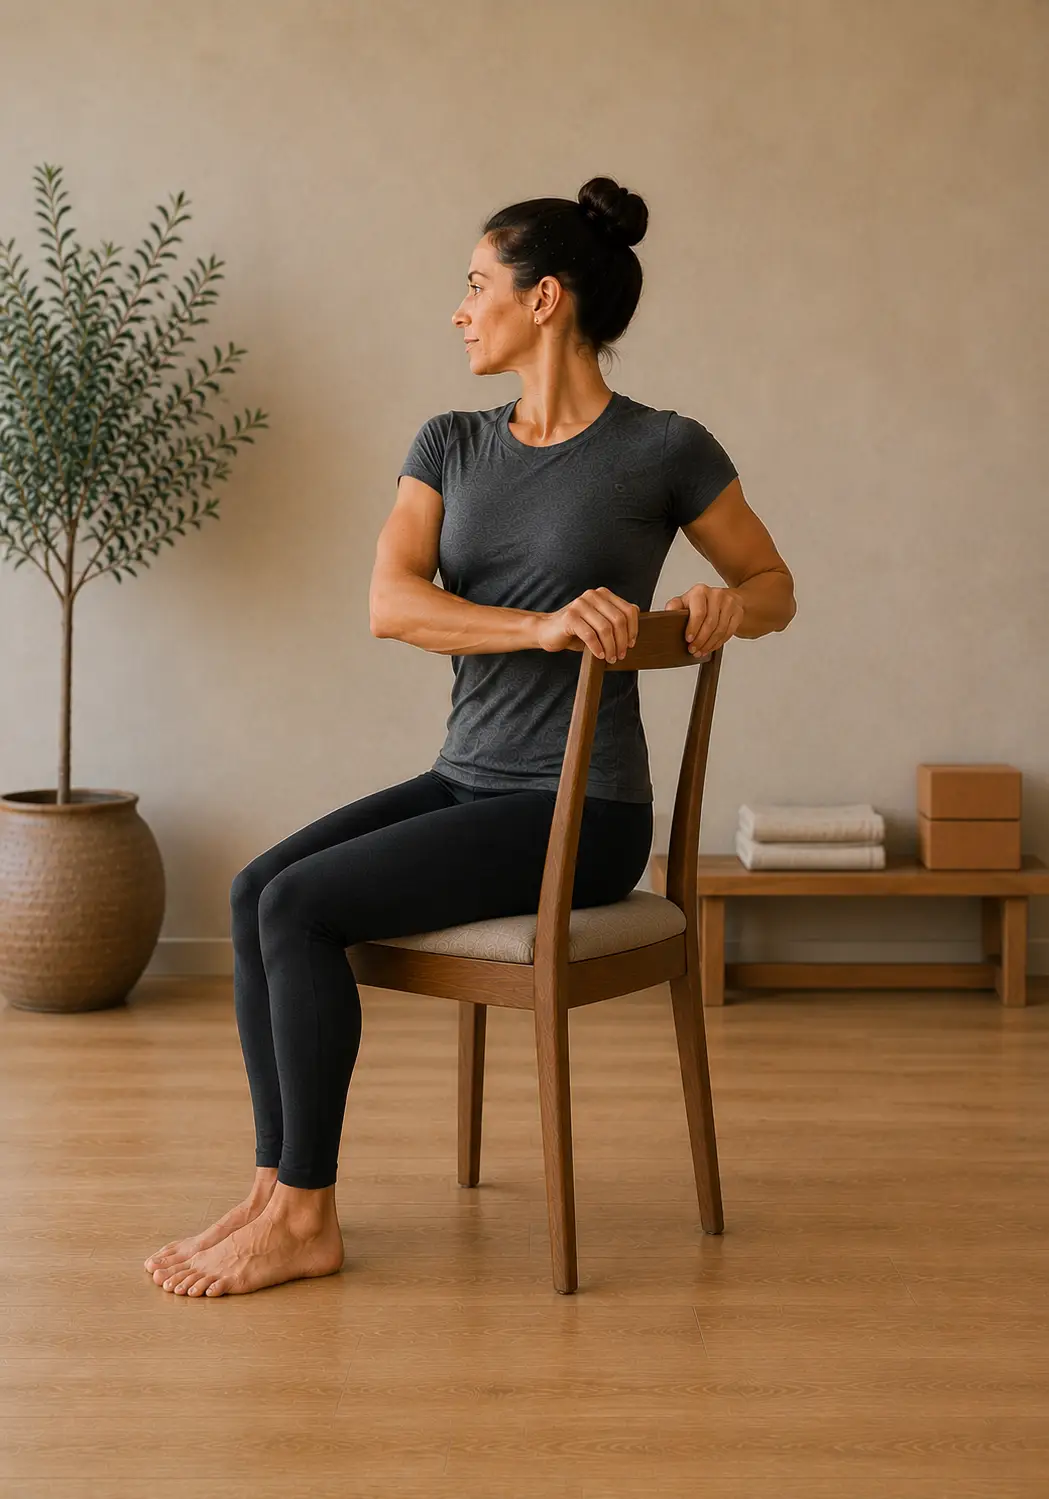
5. Bharadvajasana on a Chair – 2 Minutes each side

Sit sideways on a chair and gently rotate towards the back of the chair. Lengthen the spine to twist and hold onto the back of the chair with both hands.
The chair makes the pose accessible while helping students understand the actions of twisting safely.
6. Savasana (Corpse Pose) – 3 Minutes
Lie comfortably on your back with support beneath the head if needed. Allow the breath to become soft and natural. Even a short Savasana can be really refreshing.
30-Minute Beginner Sequence with Instructions
When you have more time available, this iyengar yoga poses sequence provides a more complete introduction to the major categories of poses.
1. Sukhasana- easy cross legged pose seated on a bolster or some yoga blocks- 2 minutes
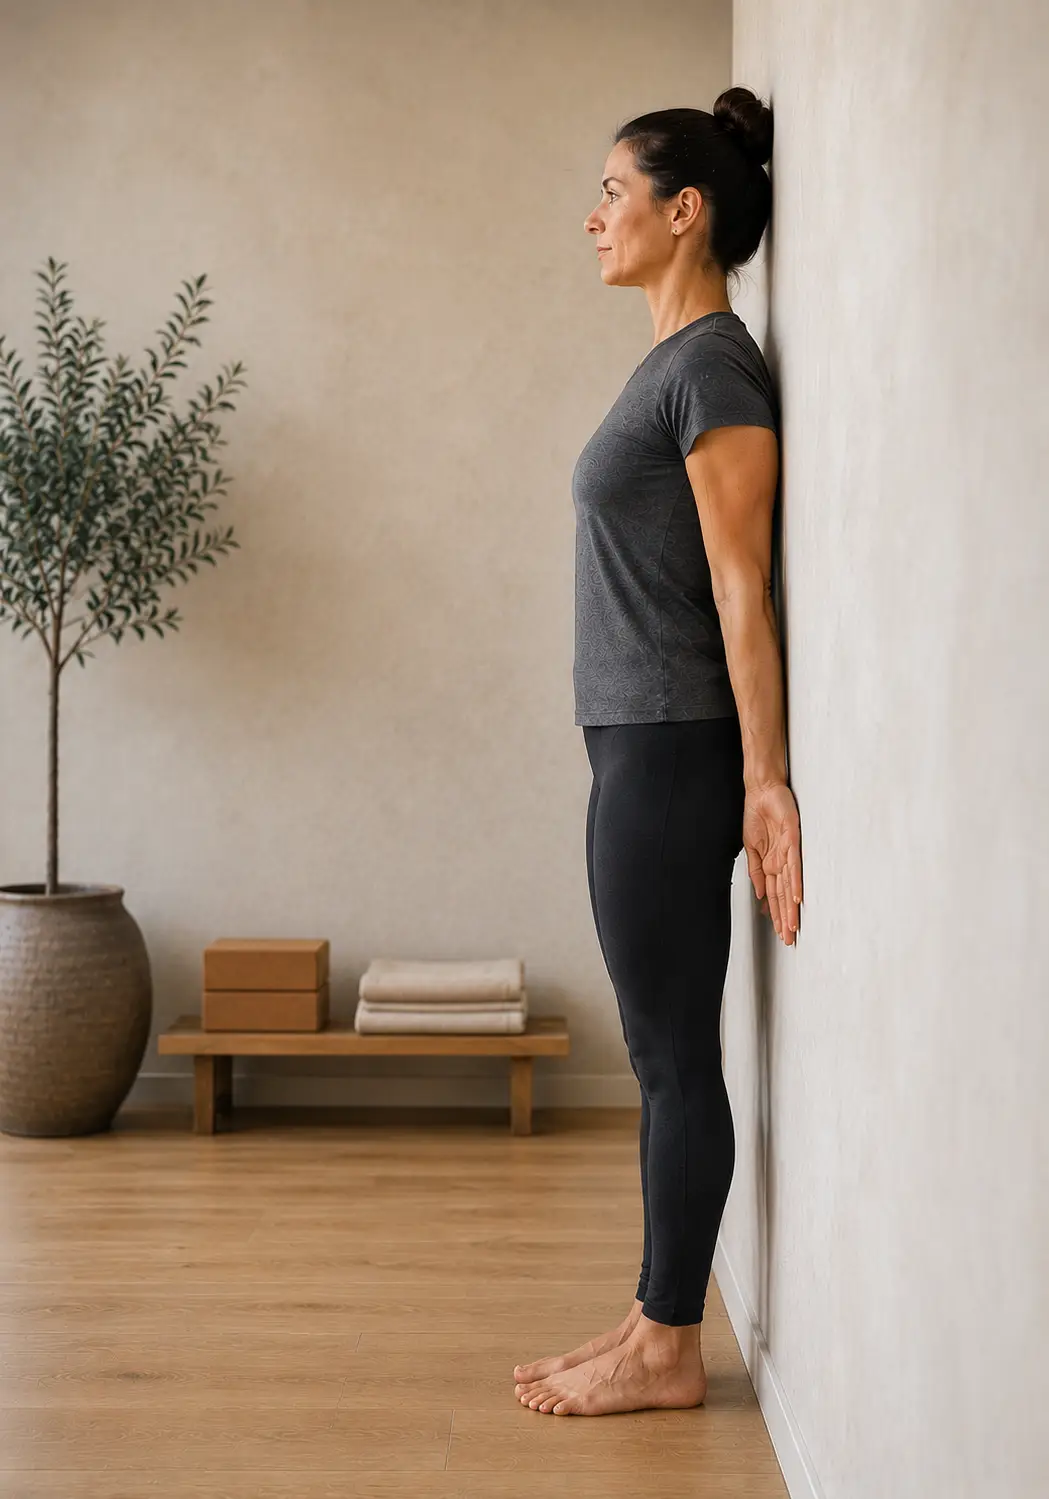
2. Tadasana – mountain pose – 1- 2 Minutes

sometimes called ‘perfect posture’ it can be done free or by a wall, feeling how tall we can stand, with our weight even on both feet.
Establish alignment, balance and awareness. Feel the buttocks firming. Breathe evenly, release if you observe tension.
3. Parsvottanasana- hands to the wall – 1 minute each side- repeat 3 times
4. Prasarita Padottanasana (Wide-Legged Forward Bend) – 3 Minutes
Stand with the feet 4-5 feet apart (depending on your height). Extend the trunk forwards maintaining strong legs. Use blocks beneath the hands to maintain extension in the spine. An easier version is the head and arms resting onto a chair seat.
5. Adho Mukha Svanasana – 3 Minutes
Practise continuously or in shorter repetitions depending on your experience.
6. Bharadvajasana on a chair- 2 Minutes Each Side
Create length before rotation and keep the breath relaxed.
7. Chatush Padasana (hip thrusts x 3) 1 minute
Lying down with no props at all, bend both knees up, to plant the feet firmly on the floor. Firm the buttocks to lift the pelvis up and down very slowly, to move the whole spine, while the head and shoulders stay firmly grounded. Observe which muscles are working.
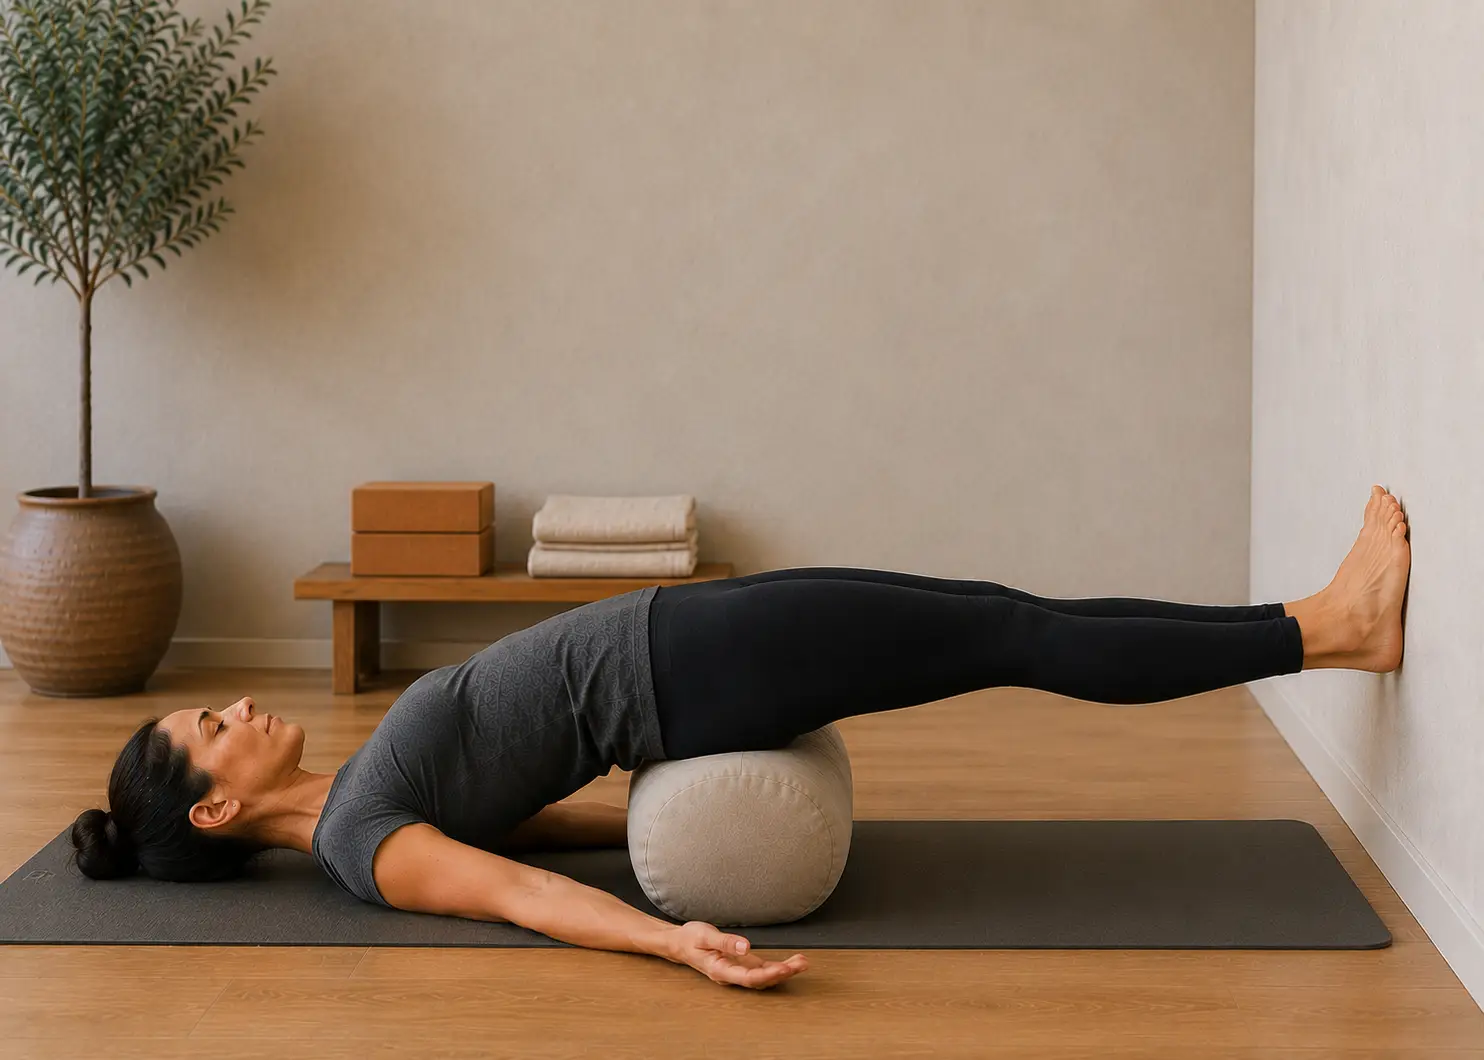
9. Setu Bandha Sarvangasana (Supported Bridge Pose) – 5 Minutes

Place a bolster or yoga blocks beneath the buttocks to create a supported chest opening pose. The classic pose is with 2 straight legs; pressing the feet into the wall really helps. You can go into this straight after the last pose, by simply sliding the bolster under the buttocks to sit on.
10. Savasana – 4 Minutes
Finish the practice with complete relaxation. Watching how the breath finds it own natural rhythm. Always roll to the side to come out (recovery position).
This iyengar beginner sequence introduces students to standing poses, forward extensions, twists, gentle back extensions and restorative work within a balanced structure.
Tips for Building a Sustainable Home Practice
- Practise little and often.
- Choose a regular time of day if possible.
- Keep props easily accessible; maybe leaving a mat out will encourage you to practice.
- Start with simple sequences.
- Observe the effects of practice rather than chasing achievement.
- Don’t strive for perfection.
A simple, consistent practice usually produces better long-term results than constantly changing routines.
Safety Considerations for Beginners
When practising at home, it is important to respect your current abilities and limitations.
- Never force a movement or stretch.
- Use props whenever they improve comfort or alignment.
- Move out of any pose that causes pain.
- Avoid unsupported inversions until you have learned them with a qualified teacher.
- Seek professional guidance if you have injuries or medical concerns.
One of the strengths of Iyengar Yoga is its adaptability. With appropriate modifications and prop support, many students can practise safely regardless of age or previous experience.
When to Progress to Intermediate Sequences
Many students wonder when they should move beyond a basic iyengar sequence.
Progress is not measured by flexibility alone. In Iyengar Yoga, understanding, stability and awareness are equally important.
You may be ready to progress when:
- You can maintain standing poses steadily.
- You understand basic alignment principles.
- You practise consistently each week.
- You can follow a sequence without confusion.
- Your breathing remains calm throughout practice.
Intermediate sequences often include longer holding times, more demanding standing poses and carefully introduced inversions.
The Importance of Teacher Guidance Alongside Home Practice
Although an iyengar yoga sequence for beginners can be practised successfully at home, teacher guidance remains invaluable.
Many alignment habits are difficult to identify without feedback. A qualified teacher can often make small adjustments that significantly improve comfort, stability and understanding.
If you are new to the method, consider attending beginner classes alongside your home practice. You can learn more about our Yoga Classes and Workshops. I teach Saturdays in Horsham, West Sussex, and Sundays in Hove, East Sussex.
For students who would like a personalised approach, our One-to-One Yoga Sessions provide individual guidance and tailored sequence development based on your goals, experience and physical needs.
Frequently Asked Questions
How often should beginners practise Iyengar Yoga at home?
Most beginners benefit from practising two to four times per week. Consistency is usually more important than duration.
Can I do an iyengar yoga sequence for beginners every day?
Yes. Many students enjoy a daily practice. The length and intensity can be adjusted according to your experience and available time.
Do I need props for Iyengar Yoga?
Props are highly recommended because they help students experience the correct actions and alignment more clearly. However, household alternatives can often be used when necessary. Using a wall is great, too.
How long should an iyengar home practice be?
Beginners can start with 15 minutes and gradually increase to 30 minutes or longer as confidence develops.
Can I learn Iyengar Yoga entirely from home?
Home practice is extremely valuable, but it works best alongside guidance from a qualified teacher who can help refine alignment and sequencing.
Final Thoughts
An iyengar yoga sequence for beginners offers a safe and structured introduction to yoga practice. By using props intelligently, following a logical progression of poses and practising consistently, beginners can develop strength, flexibility, awareness and confidence.
Start simply, focus on quality rather than quantity, and allow your understanding to develop gradually. Over time, your home practice can become a valuable complement to classes, supporting both physical wellbeing and mental clarity for years to come. If you have any questions, feel free to email me on [email protected]